Page 1 of 14
The Debian-Live Daedalus Starter Kit
Posted: Fri Aug 28, 2020 10:16 am
by rcrsn51
I have posted here an ISO for the next generation of the Starter Kit project. It is based on Devuan Daedalus. This is Debian Bookworm without the annoying stuff like systemd and usr-merge. The ISO is mirrored in Fred's repo here.
It was made using a variation of Fred's mklive script and has the current k6.1.0-9-amd64 kernel. There is a kernel upgrade here.
Code: Select all
52d8e247b555548fa48d391d18ee427f DebLive_daedalus-6109-amd64.iso
See the next post for the recommended installer tool.
To build a general-purpose bootable flash drive, read below about ISObooter. Please note that Starter Kit ISOs CANNOT be written to a flash drive with dd. If you are starting from Windows, make a bootable flash drive of the Starter Kit using a tool like Rufus.
See here for discussions about GPT/GRUB2, and about UEFI/Secure Boot. But note that the Starter Kit continues to work with legacy MBR/BIOS setups.
As usual, your first step after installing is to run the command: apt update && apt upgrade
Get a Palemoon v28.15.0 squashfs module here. Drop it into the "live" folder of your Starter Kit install.
Get a squashfs module for Ungoogled Chromium here. Remember to make the "guest" user.
Get Firefox using wget and extract it into /opt. Run it from the Internet menu.
Code: Select all
wget --no-check-cert ftp.mozilla.org/pub/firefox/releases/113.0.1/linux-x86_64/en-CA/firefox-113.0.1.tar.bz2
The matching combo-wifi-driver-pack is now available for this kernel. Read here (#36) for info about the driver pack. Then read the update here about Broadcom and Intel firmware.
For print/scan, read here (#74). CUPS requires a login as root:root.
Updated info about Brother models is here. A further update is here that discusses modern AirPrint technology.
A new HP driver is here. It supports HP models up to Nov 2022.
For Epson printers, read here. Note that there are two methods:
- the vendor driver package and the "eppi" installer tool. Note the comment about libcupsimage2.
- the printer-driver-escpr package from the Debian repo.
New Starter Kit users should read the original Stretch Starter Kit thread here. It has information about adding content to your setup. Most of the apps have been updated for Bookworm/Daedalus and are in Fred's repo via apt-get.
The subsequent Buster Starter Kit thread starts here and continues in this thread below.
The Debian-Live Multi Installer v5 and ISObooter3
Posted: Fri Aug 28, 2020 10:21 am
by rcrsn51
This is the next generation of the Multi Installer. Hard drive setups are done with the GRUB2 bootloader. Read here. But note that you do NOT need to switch a drive to GPT in order to use GRUB2 - it also works with legacy MBR drives. Read below for more details. You can also set up a bootable USB drive with GRUB2 - just select sdb as the target.
GRUB2 download: https://www.mediafire.com/file/vdfk10j9 ... ashfs/file
UEFI download: https://www.mediafire.com/file/0l01keg4 ... ar.gz/file It contains an EFI folder and a .cer file.
Alternate UEFI package: viewtopic.php?p=4570#p4570
Puppy users: To get GRUB2, install the "grub2" package from your PPM. Or download my GRUB2 squashfs module, rename it as a .sfs and load it.
Extract the attached file below as usual. It is NOT a fake .gz package. The Installer can be run from any platform that has gtkdialog (like Puppy).
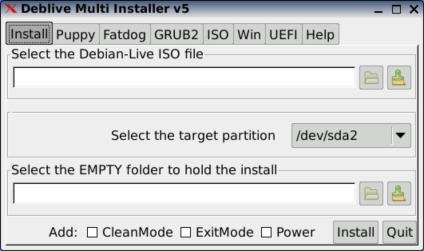
- xscreenshot-20230727T064655.jpg (25.83 KiB) Viewed 8003 times
The Starter Kit now uses ISObooter3 to build a multi-purpose bootable USB drive.
If you are starting with a functional hard drive, go to Step 7. Otherwise, you will need to work from your ISObooter3 flash drive.
Copy two files to the ISObooter3 ext4 partition: the deblive-multi-installer-5 and the GRUB2 squashfs module from the link above.
Run Gparted. Open the Device section and rebuild the target drive. As a general rule, UEFI machines should have GPT drives while BIOS machines can be either MBR or GPT.
Make two partitions - a small (2GB) fat32 partition and an ext4 partition. On BIOS machines, flag the fat32 partition as bootable.
Install a bootloader on the the target drive. Depending on the computer, you could enable legacy BIOS booting, modern UEFI booting or both, as follows:
For a BIOS machine, right-click on the above GRUB2 squashfs module and activate it. Run the Multi Installer and open the GRUB2 section. Select the MBR of the target drive for Stage1 and its first partition for Stage2. Install GRUB2.
For a UEFI machine, simply copy the EFI folder from the flash drive to the first partition of the hard drive. This is now your EFI System Partition.
Make a destination folder on the second hard drive partition and run the Multi Installer.
Put the new GRUB2 menu code into a grub.cfg file on the target drive. For a BIOS setup, look in /boot/grub of the first partition. For UEFI, look in /EFI/grub.
Reboot off the target computer.
PeasyWiFi Update
Posted: Fri Aug 28, 2020 10:27 am
by rcrsn51
This update is now available from Fred's repo with an "apt upgrade" operation.There are two changes:
1. The Encrypt section has been removed. To hide the passphrase in a profile, just replace all (or part) of it with "XXXX". When you connect, PWF will prompt for the actual passphrase. For example:
Code: Select all
psk="XXXX"
 or
psk="secretXXXXpassword"
2. There are improved instructions for setting up an alternate Ethernet interface like usb0. Look under the Ethernet tab for the Names tool.
--------------------------
Backlight-keys
Posted: Fri Aug 28, 2020 10:29 am
by rcrsn51
This app lets you control a laptop's backlight using the keyboard brightness keys. It works with most video hardware and does NOT require the xbacklight program, which appears to only work on Intel video.
After installing the package, read the file /usr/local/bin/backlight-keys.txt. It has instructions for modifying the openbox config to enable the keyboard controls.
-----------------------
CPU-X
Posted: Mon Aug 31, 2020 10:23 am
by rcrsn51
This is the CPU-X system information tool as reported by Mike Walsh and packaged for 64bit Buster. Download it
here.
Re: The Debian-Live Buster Starter Kit
Posted: Mon Aug 31, 2020 10:07 pm
by rcrsn51
This is the Buster Starter Kit on an Acer TravelMate netbook. It has a Celeron chipset, 4GB RAM, a spinning hard drive, Intel Wifi/Bluetooth and HDMI.
The original factory setup was Win8/UEFI/GPT. As usual, the refurbishers "upgraded" it to Win10/Legacy BIOS. I wanted to restore the native structure, but there was one additional wrinkle. I had to set an admin BIOS password before I could disable Secure Boot. The system can now boot two ways:
1. In UEFI mode where partition sda1 is the standard FAT32 ESP.
2. In BIOS mode with Legacy GRUB stage1 on the MBR and stage2 on a Linux partition.
Everything works OOTB (after supplying the iwlwifi firmware) except for the Winbond SD card reader. However, it DOES work with the k5.6.0 kernel upgrade.
Networked print/scan is handled through "driverless" Airprinting.
---------------------
How to add Puppy/Dog distros to a BigBoy Linux setup
Posted: Thu Sep 03, 2020 5:35 am
by rcrsn51
Once a Linux like Ubuntu or Mint has been installed, particularly on a UEFI system, it is often simpler to let its GRUB2 bootloader manage the boot process. Just add some code to its grub.cfg that handles your distros.
Let's assume that your installs are on Partition sda5 and there is a combo grub.cfg file at the start of that partition. Remember that GRUB2 starts numbering partitions at 1.
Boot the BigBoy Linux and locate the file /etc/grub.d/40_custom. Open it in a text editor as the root user. Do this by running a terminal and typing a command like: sudo gedit 40_custom
Add this code:
Code: Select all
menuentry "My Installs on Partition sda5" {
set root=(hd0,5)
configfile /grub.cfg
}
Now modify the Linux boot sequence to display a menu. Open the file /etc/default/grub as the root user.
Add/modify lines like the following:
Code: Select all
GRUB_TIMEOUT_STYLE=menu
GRUB_TIMEOUT=10
Run the command: sudo update-grub
Do a cold reboot.
---------------------
Re: The Debian-Live Buster Starter Kit
Posted: Thu Sep 03, 2020 9:41 am
by fredx181
rcrsn51 wrote:Attached below is an update to the main PWF script. (It does NOT replace the entire package.)
Would it be OK for you if I make it a full package 4.7 and add to repo, so that it becomes an updated version ?
Fred
Re: The Debian-Live Buster Starter Kit
Posted: Thu Sep 03, 2020 9:52 am
by rcrsn51
fredx181 wrote: ↑Thu Sep 03, 2020 9:41 amWould it be OK for you if I make it a full package 4.7 and add to repo, so that it becomes an updated version ?
Please do.
More about Openbox laptop keyboard controls
Posted: Thu Sep 03, 2020 2:43 pm
by rcrsn51
If you have installed
Backlight-keys above, you have read the instructions for modifying openbox's rc.xml file. Here are more options. In each case, remember to run the command: openbox --reconfigure
1. To shut down immediately from the On/Off button:
Code: Select all
    <keybind key="XF86PowerOff">
      <action name="Execute">
        <command>poweroff</command>
      </action>
    </keybind>
2. To control the Volume Up/Down buttons:
Code: Select all
    <keybind key="XF86AudioRaiseVolume">
      <action name="Execute">
        <command>amixer set Master 5%+</command>
      </action>
    </keybind>
    <keybind key="XF86AudioLowerVolume">
      <action name="Execute">
        <command>amixer set Master 5%-</command>
      </action>
    </keybind>
    <keybind key="XF86AudioMute">
      <action name="Execute">
        <command>amixer set Master toggle</command>
      </action>
    </keybind>
Note that these keybindings adjust the ALSA "Master" control. Depending on your audio hardware, this may not be the best choice. Try using a different control, like "PCM". You can also adjust several controls at once by duplicating the <action>...</action> section.
Gnetcat Update
Posted: Sat Sep 05, 2020 4:16 pm
by rcrsn51
Gnetcat from here has a new "Loop" option. Ordinarily, once the Receiver gets the data, the operation terminates on both ends. But if the Sender enables looping, it will automatically repeat the sending operation. This lets the Receiver get the data again if needed or lets multiple Receivers download the data.
Update: With v1.5, you can run several concurrent Send jobs on separate ports with different data.
Update: V1.6 has some code cleanup. It is now available in Fred's repo.
---------------------------
PeasyMag
Posted: Tue Sep 08, 2020 12:46 pm
by rcrsn51
PeasyMag is a little screen magnification app that uses xrandr functions. It runs from the system tray - restart X after installing the package.
On laptops, you may need some trial-and-error to find a resolution that magnifies correctly.
PeasyMag also has a "preset" option. Create the hidden text file ~/.peasymag and list one or more preferred resolutions.
As usual, this project needs testing and feedback.
Edit: This project is now in Fred's repo via apt-get.
-------------------------
How to make a Starter Kit bootable flash drive for a UEFI-only system
Posted: Thu Sep 10, 2020 4:53 pm
by rcrsn51
This procedure does not require Grub4Dos.
1. Format the flash drive as fat32.
2. Download and extract the "full" UEFI package from here. It contains both 32/64 bit versions of the UEFI firmware and a ready-made grub.cfg file.
3. Copy the EFI folder and .cer file onto the flash drive.
4. Copy the Bullseye Starter Kit ISO onto the flash drive.
5. Boot off the flash drive.
6. For a multi-boot system, put the isobooter script on the drive with some other ISOs.
Booting BigBoy Linuxes from GRUB2
Posted: Thu Sep 10, 2020 10:04 pm
by rcrsn51
If you have a machine booting with GRUB2, you can launch many BigBoy Linuxes directly out of their ISO files. This could be a BIOS machine or a UEFI machine running in "native" mode. Here is a recipe - modify it as desired.
Update: The Deblive Multi Installer v2 can now generate this type of menu entry from its ISO section.
1. Select a partition to hold the ISOs. Identify its UUID using the "blkid" command.
2. Make a folder on that partition named "BigBoy". Copy the ISOs there.
3. For each ISO, make a GRUB2 entry and add it to your main grub.cfg file. See the examples below:
Note that each entry has two variables:
a. "isopath" - the exact path to the ISO file, prefixed by a "/"
b. "uuid" - the UUID of the target partition.
Code: Select all
menuentry "Ubuntu 18.04 Desktop ISO" {
	set isopath="/BigBoy/ubuntu-18.04.1-desktop-amd64.iso"
	set uuid="ad5ab2f4-53b0-4fae-8f98-2cd797af424c"
	search --no-floppy --fs-uuid --set=root $uuid
	loopback loop $isopath
	linux (loop)/casper/vmlinuz boot=casper iso-scan/filename=$isopath noeject noprompt splash --
	initrd (loop)/casper/initrd.lz
}

menuentry "linuxmint-19.1-xfce-64bit" {
	set isopath="/BigBoy/linuxmint-19.1-xfce-64bit.iso"
	set uuid="ad5ab2f4-53b0-4fae-8f98-2cd797af424c"
	search --no-floppy --fs-uuid --set=root $uuid
	loopback loop $isopath
	linux (loop)/casper/vmlinuz boot=casper iso-scan/filename=$isopath noeject noprompt splash --
	initrd (loop)/casper/initrd.lz
}

menuentry "xubuntu-18.04.4-desktop-amd64" {
	set isopath="/BigBoy/xubuntu-18.04.4-desktop-amd64.iso"
	set uuid="ad5ab2f4-53b0-4fae-8f98-2cd797af424c"
	search --no-floppy --fs-uuid --set=root $uuid
	loopback loop $isopath
	linux (loop)/casper/vmlinuz boot=casper iso-scan/filename=$isopath noeject noprompt splash --
	initrd (loop)/casper/initrd
}

menuentry "Manjaro 17.1.6" {
	set isopath="/BigBoy/manjaro-kde-17.1.6-stable-x86_64.iso"
	set uuid="ad5ab2f4-53b0-4fae-8f98-2cd797af424c"
	search --no-floppy --fs-uuid --set=root $uuid
	loopback loop $isopath
  linux  (loop)/boot/vmlinuz-x86_64 img_dev=/dev/disk/by-uuid/$uuid img_loop=$isopath
  initrd (loop)/boot/initramfs-x86_64.img
}

menuentry "ArchBang" {
   set isopath="/BigBoy/archbang-winter-rc-1202-x86_64.iso"
   set uuid="ad5ab2f4-53b0-4fae-8f98-2cd797af424c"
   search --no-floppy --fs-uuid --set=root $uuid
   loopback loop $isopath
  linux  (loop)/arch/boot/x86_64/vmlinuz img_dev=/dev/disk/by-uuid/$uuid img_loop=$isopath
  initrd (loop)/arch/boot/x86_64/archiso.img
}
4. Reboot.
Once the ISO is booted, you can do a regular install onto an available partition. If you structured your drive as GPT, you have lots of them.
Some Ubuntu-based ISOs can also use persistent storage. Create another partition and give it the label "casper-rw". Add the boot argument "persistent" to the GRUB menu.
Code: Select all
linux (loop)/casper/vmlinuz boot=casper iso-scan/filename=$isopath noeject noprompt splash persistent --
--------------------
Re: The Debian-Live Buster Starter Kit
Posted: Fri Sep 11, 2020 8:41 pm
by Clarity
+1
- I keep ALL of my ISOs in a central folder "/BOOTISOS".
- So, For each ISO, I edit a GRUB2 entry into the main grub.cfg file.
Following are 3 ISOs
examples added to a GRUB2
Code: Select all
menuentry "Ubuntu 20.04 Desktop ISO" {
	set isopath="/BOOTISOS/ubuntu-20.04.1-desktop-amd64.iso"
	set uuid="ad5ab2f4-53b0-4fae-8f98-2cd797af424c"
	search --no-floppy --fs-uuid --set=root $uuid
	loopback loop $isopath
	linux (loop)/casper/vmlinuz boot=casper iso-scan/filename=$isopath noeject noprompt splash --
	initrd (loop)/casper/initrd.lz
}

menuentry "xubuntu-20.04.4-desktop-amd64" {
	set isopath="/BOOTISOS/xubuntu-20.04.4-desktop-amd64.iso"
	set uuid="ad5ab2f4-53b0-4fae-8f98-2cd797af424c"
	search --no-floppy --fs-uuid --set=root $uuid
	loopback loop $isopath
	linux (loop)/casper/vmlinuz boot=casper iso-scan/filename=$isopath noeject noprompt splash --
	initrd (loop)/casper/initrd
}

menuentry "Manjaro v20" {
	set isopath="/BOOTISOS/manjaro-kde-20.0-200426-linux56.iso"
	set uuid="ad5ab2f4-53b0-4fae-8f98-2cd797af424c"
	search --no-floppy --fs-uuid --set=root $uuid
	loopback loop $isopath
  linux  (loop)/boot/vmlinuz-x86_64 img_dev=/dev/disk/by-uuid/$uuid img_loop=$isopath
  initrd (loop)/boot/initramfs-x86_64.img
}
Change according to your needs.
Peasy DVD Player
Posted: Sat Sep 26, 2020 11:52 am
by rcrsn51
See the new Peasy DVD app here.
Apulse
Posted: Wed Sep 30, 2020 9:45 pm
by rcrsn51
This is apulse built from the latest github sources
Update: This package is now in Fred's repo.
Re: The Debian-Live Buster Starter Kit
Posted: Mon Oct 05, 2020 12:55 pm
by rcrsn51
This is the Dell Optiplex 3020 desktop from the Stretch Starter kit thread. It was originally a Win8/UEFI machine that was refurbished to Win10 in Legacy mode. Because I wanted to keep Windows intact, I split off a Linux partition that I booted from a Grub4Dos flash drive. This worked fine.
But I then decided to eliminate the flash drive and boot the machine directly via Grub4Dos on the MBR. At this point, all hell broke loose. The machine appeared to be having a complete system failure that included video, audio, ethernet, etc. I originally suspected that the culprit was a bad Debian upgrade or a defective hard drive. After much troubleshooting, I eventually identified the problem - Legacy mode!
So I reverted the machine to its original UEFI/GRUB2/GPT structure and everything went back to normal. With the addition of a Geforce video card, it can run Google Earth through the Chrome browser at full speed.
The conventional wisdom in the Puppy community is to immediately switch a UEFI machine into Legacy mode so it works like a "regular" computer. My experience over similar episodes has been the exact opposite. To get the full functionality out of a UEFI machine, you should run it in UEFI mode like the builders intended.
HPLIP Print/Scan
Posted: Tue Oct 06, 2020 2:05 pm
by rcrsn51
Removed due to lack of interest.
If anyone needs this package, which supports all the latest HP printer models, they should post a request.
Samba Server
Posted: Sat Oct 10, 2020 5:26 pm
by rcrsn51
Project withdrawn. If anyone is still interested, please post a request.
Installing Brother printers in Buster64 [update]
Posted: Fri Oct 16, 2020 12:44 pm
by rcrsn51
Many Brother printer models only have 32bit Linux drivers, so some work-arounds are required.
1. Read the general instructions from the old forum here #74. It also discusses Brother scanner drivers.
2. If you have a Brother laser printer, the 64bit driver from here #383 may work well. This driver is also available from the Debian repos as printer-driver-brlaser.
3. If you have an inkjet printer with just a 32bit driver, follow these new instructions.
Important: Some Brother drivers need Perl. After installing the driver, check by running: grep -r perl /opt/brother
If you need it, get the "perl" package via apt-get. Or just install it in advance to be safe.
a. Download the http://www.mediafire.com/file/o8is279ar ... ashfs/file. It contains the 32bit libraries required by the Brother driver.
b. Drop this squashfs module into the "live" folder of your install so it will be auto-loaded at bootup.
c. Download the two Debian printer driver packages.
d. They must be installed from the command line using "debbi-compat". For example, open a terminal (F4) where the files are located and run:
Code: Select all
debbi-compat mfcj470dwlpr-3.0.0-1.i386.deb #Hint: use Tab completion
debbi-compat mfcj470dwcupswrapper-3.0.0-1.i386.deb
e. Go to /usr/lib/cups/filter and locate the Brother file named something like br_xxx_model.
f. Open a terminal and run:
4. The above procedure may have automatically installed a CUPS printer. Test it. Otherwise, do the usual CUPS install.
---------------------------
Re: Installing Brother printers in Buster64 [update]
Posted: Sat Oct 17, 2020 8:24 am
by watchdog
rcrsn51 wrote: ↑Fri Oct 16, 2020 12:44 pm
Many Brother printer models only have 32bit Linux drivers, so some work-arounds are required.
1. Read the general instructions from the old forum
here.
2. If you have a Brother laser printer, the 64bit driver from
here may work well.
3. If you have an inkjet printer with just a 32bit driver, follow these new instructions.
Important: Some Brother drivers need Perl. After installing the driver, check by running: grep -r perl /opt/brother
If you need it, get the "perl" package via apt-get. Or just install it in advance to be safe.
a. Download the
http://www.mediafire.com/file/o8is279ar ... ashfs/file. It contains the 32bit libraries required by the Brother driver.
b. Drop this squashfs module into the "live" folder of your install so it will be auto-loaded at bootup.
c. Download the two Debian printer driver packages.
d. They
must be installed from the command line using "debbi-compat". For example, open a terminal (F4) where the files are located and run:
Code: Select all
debbi-compat mfcj470dwlpr-3.0.0-1.i386.deb #Hint: use Tab completion
debbi-compat mfcj470dwcupswrapper-3.0.0-1.i386.deb
e. Go to /usr/lib/cups/filter and locate the Brother file named something like br_xxx_model.
f. Open a terminal and run:
4. The above procedure may have automatically installed a CUPS printer. Test it. Otherwise, do the usual CUPS install.
---------------------------
I was successfull adapting your post to install my Brother laser printer in ScPup64 in several manners. ScPup64 uses lib64 and /usr/lib64 dirs so your packages are to be repackaged to use in slackware puppies. The old project which was retired in the oldforum about 64BitInstaller in Puppy is still working. Many thanks.
Re: The Debian-Live Buster Starter Kit
Posted: Wed Oct 21, 2020 3:39 am
by Clarity
I'm interested.
Need Remote Desktop that brings sound back to the client. So, if I can autodesk from its client to an Autodesk host where one can watch & hear a video (ie Youtube) running on the host session at the client, this matches a requirement I have.
I am not familiar nor ever used Autodesk. But its site seems to indicate it will meet requirements. Hope you have had experience with my use-case need.
Re: The Debian-Live Buster Starter Kit
Posted: Wed Oct 21, 2020 12:41 pm
by rcrsn51
I messed around with audio in AnyDesk but could not get it working, possibly because the Linux version requires PulseAudio. Even with PulseAudio installed, I could not get audio transmission.
I suspect that the audio transmission function is designed to let the remote user talk to you via a mic. It is not designed to stream any audio playing on the remote machine.
If your intent is to watch a video running on the remote desktop, you will probably be disappointed. In my tests, the transmission rate was too slow and the playback was choppy.
Since you have not yet tried AnyDesk, I would suggest that you start on a Puppy platform where it is easier to set up. The Puppy maintainers may have info about audio.
Update: No reply from Clarity.
Peasy YouTube Downloader
Posted: Sat Oct 31, 2020 12:26 pm
by rcrsn51
Note: This package does NOT contain the core Python app "youtube-dlc". Use the following commands to get it:
Code: Select all
wget --no-check-cert https://github.com/blackjack4494/yt-dlc/releases/latest/download/youtube-dlc -O /usr/local/bin/youtube-dlc
chmod +x /usr/local/bin/youtube-dlc
1. Open YouTube in a web browser. Locate the desired clip.
2. Open Peasy YTDL in another window. Copy/paste in the clip's URL.
3. Select the location of your Download folder.
4a. Start with the Option "-F" and click Download.
4b. You will get a list of the various formats for this clip and their code numbers.
4c. Press Enter to close the window.
4d. If the first download attempt fails, try again.
5. Change the Option to "-f nnn" and click Download.
6. Click View to see the Download folder. Test the file in a media player.
Hints:
a. Try "-f 251" (audio only) or "-f 18" (audio+video).
b. If you do NOT enter an option, youtube-dlc will choose a format (usually the best quality).
c. You can select separate audio and video streams and combine them. Try: "-f 250+242".
Re: The Debian-Live Buster Starter Kit
Posted: Sat Oct 31, 2020 1:53 pm
by fredx181
rcrsn51 wrote:Note: This package does NOT contain the core Python app "youtube-dl". Get it from a location like here and copy it to /usr/local/bin.
Now that updating youtube-dl "itself" (youtube-dl -U) doesn't work anymore, I think it's best to compile yourself from time to time, to be sure of having the newest fixes.
Found out recently that it's very easy, just git clone the repository
https://github.com/l1ving/youtube-dl (or download zip and extract), then from terminal in the youtube-dl folder type "make" (need to have "make" installed, obviously).
Fred
Re: The Debian-Live Buster Starter Kit
Posted: Sun Nov 01, 2020 12:57 pm
by rcrsn51
Gnetcat updated on page 2.
Photo Cropper
Posted: Sun Nov 08, 2020 2:46 pm
by rcrsn51
This is an update to Photo Cropper from here.
V1.2 adds an option to put a white border around the image before processing. This gives you some slack space to reach a 4x6 aspect ratio without cropping too much of the image off the sides.
This feature can also be useful if your printer always chops off the edges of a photo.
The latest version is now in Fred's repo.
-------------------
Iron browser update
Posted: Mon Nov 09, 2020 11:52 am
by rcrsn51
The instructions here for building an Iron squashfs module still apply, but there is a bug in the setup script.
The patched version is posted below.
As with other Chromium-based browsers, Iron has trouble sending audio to alternate devices like Bluetooth and must be run in "--no-sandbox" mode.
Re: The Debian-Live Buster Starter Kit
Posted: Sat Nov 14, 2020 3:25 pm
by rcrsn51
This is an ASUS EB1033 mini-PC. There are often good Ebay deals on this kind of unit, especially when sold as bare-bones. This one has an Atom D2700 (2.13 GHz) chipset, 4GB RAM and an SSD. It has NVDIA video, which works fine with the modesetting nouveau driver. It has enough power to run Google Earth out of the Chrome browser.
This is a newer generation of Atom machines after the early netbooks, so it has optional HDMI output and USB3. But it still requires active cooling unlike the fanless Celeron cloudbooks that followed.
There is no audio line-out on the back, but you can get decent sound by plugging speakers into the front headphone port.
I replaced the internal Atheros WiFi adapter with a BCM43228 so I could test Broadcom drivers. It works with either the legacy b43 or the new wl driver.
There is no built-in Bluetooth, but it works fine with a USB adapter and my bt4stretch package. YouTube streaming audio through Mozilla browsers is automatic.
The system firmware is interesting. It claims to be UEFI and will boot a UEFI flash drive. But it only recognizes a Linux hard drive setup when in BIOS mode and cannot detect a GPT drive at all. It may be that the firmware was designed to expect that a UEFI hard drive contains Windows.
If you don't mind a little fan noise, these are excellent basic machines.
--------------