Customizing the JWM Tray (taskbar) Part 2
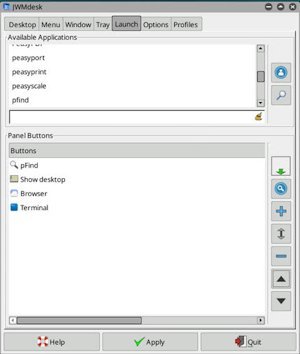
Add the Pfind (search) program:
-Menu>Desktop>JWMdesk>Available Applications
-scroll down to: Pfind
-click: Pfind
Pfind will now appear in the Panel Buttons window
-use the up/down arrow buttons (on the right) to move Pfind above Show desktop
-click: Apply

- pfind2.jpg (16.59 KiB) Viewed 1169 times
Add a custom directory
A custom directory can be used as a “launch” directory and contain link icons to your most used programs and documents (sort of like a custom menu). In this example we’ll use “Mydesk” which is located at: /root/Mydesk. The tray icon makes it always accessible.
There are two methods to implement this, the first method is the easiest, the second is more refined.
Method 1
-create the directory: /root/Mydesk
-Menu>Desktop>JWMdesk>Available Applications
-scroll down to: rox filer
-click: rox filer
rox filer will now appear in the Panel Buttons window
-use the up/down arrow buttons (on the right) to move rox filer above Show desktop
-click: Apply
Clicking the Rox filer buttton in the tray will open /root where you can click Mydesk.
Method 2
Keeping track of open Rox filer windows can be a problem and opening duplicate windows is common. Method 2 limits opening Mydesk to a single instance, so you don’t have multiple Mydesk windows open. This requires 3 steps that make the required files and add the button.
Step 1
-create a mydesk.sh file using Geany editor. Here is the code:
Code: Select all
#!/bin/bash
#prevents duplicate Mydesk windows from opening
rox -D /root/Mydesk
rox /root/Mydesk
Copy and paste this into Geany and save to: /root/my-applications/bin/mydesk.sh
-right click mydesk.sh
-Permissions>Make executable>Yes
Step 2
-create a Mydesk.desk file using Geany editor. Here is the code:
Code: Select all
[Desktop Entry]
Encoding=UTF-8
Type=Application
Terminal=false
Name=Mydesk launcher
Comment=custom launch directory
Icon=/usr/share/pixmaps/puppy/open.svg
Exec=mydesk.sh
Categories=
Copy and paste this into Geany and save to: /usr/share/applications/mydesk.desk
Step 3
-if open, close: JWMdesk
-Menu>Desktop>JWMdesk>Available Applications
-scroll down to: Mydesk
-click: Mydesk
Mydesk will now appear in the Panel Buttons window
-use the up/down arrow buttons (on the right) to move Mydesk above Show desktop
-click: Apply
Clicking the Mydesk buttton in the tray will open Mydesk. Clicking it again will only bring the existing instance into focus.
Remove the Browser icon
-Menu>Desktop>JWMdesk>Panel Buttons
-click: Browser
-click the minus button (on the right)
-click: Apply
Consolidate Virtual Desktops
The next 3 buttons/boxes are for Virtual Desktops, to free up tray space we’ll reduce this to 2 desktops in one box.
-Menu>Desktop>JWMdesk>Tray>Widgets
-set Rows=2
-set Columns=1
-click: Apply
The Center Tray is next. This section shows the running programs
Adjust Running Program Button Width
-Menu>Desktop>JWMdesk>Tray>Widgets
-set Maximum width=38 (this will show the icon only)
-click: Apply
The right side of the tray is next, working from left to right.

- traybothright.jpg (7.04 KiB) Viewed 1169 times
Remove the Synapse icon
-right click the icon
-click: Preferences
-uncheck: Start on login
-uncheck: Show notification icon
-click: Close button
Remove the Parcellite (clipboard manager) icon
-open: /etc/xdg/autostart/parcellite-startup.desktop
-change: Exec=parcellite
to: Exec=parcellite -n
-save
-Restart graphical server
Remove the Pupmode 13 icon (floppy disk icon)
This icon only appears if you are running in Pupmode 13
-click the icon
-uncheck: Show Tray Icon
-click: OK button
Add the CPU temperature program
-install: pmcputemp-0.72-x86_64_s702.pet
-reboot
Change Tray Background Color (theme)
-Desktop>Legacy Theme Tools>JWM Theme
-click: Breeze_Dark
-click: Restart
When you’re finished, your tray should look something like this:

- traynewfinal.jpg (5.74 KiB) Viewed 1169 times
There are many more changes you can do with the available tools, don’t be afraid to experiment.
wizard