Continued from OP: viewtopic.php?p=1788#p1788
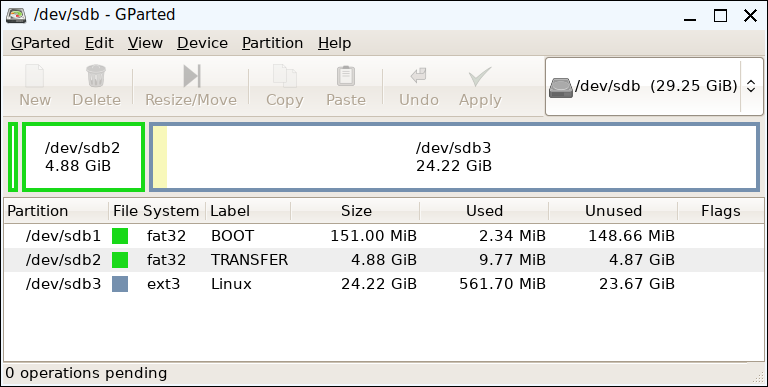
When I finished restructuring a (different) USB-Key, it looked like this.

- 4- USB-Key Configuration.png (42.79 KiB) Viewed 11030 times
Tip: For gparted to display labels you have to fill in the appropriate field before selecting the formatting. Only some Window-manager (not JWM) will display labels on the desktop. I just fill in that section to remind myself what I'm doing. 
(5) Right-Click Unallocated Space, Select New and format the rest of the USB-Key as Linux Ext3. This will hold your Puppy’s system files. IMHO, Linux Ext3 formatting works best for USB-Keys. You can find discussions by others with different opinions; or having special needs.
When you’re finished configuring how the USB-Key is to be structured, click Apply on the Toolbar.
(6) Creating a folder for your Puppy: When gparted has finished processing your instructions Puppy will re-catalog what partitions are available to it and present a new desktop display with icons just above the taskbar for each of the USB-Key’s partitions. Hovering your mouse-cursor over a desktop drive icon will provide a Tool-tip of its size and formatting.
In this recipe we are going to locate Puppy’s system files on sdb3 (the large Linux formatted partition) in its own folder.
[Although we could locate those files at the top/root of the sdb3 partition, placing them in a folder has several advantages: (a) Makes them easy to find; (b) each Puppy only needs its own folder: additional folders can be created for variations of that Puppy, or different Puppys, and the boot-”menu” hand-edited rather than again having to run an application. Hand-editing changes only one file avoiding the wear which takes place when an entire boot-loader is written. IMHO, it’s also faster: just copy, past, then edit the old folder’s name to the new in the new stanza].
Left-Click the drive/partition on which you want to locate your Puppy. In the window which opens Right-Click an empty space, select New>Directory and give it an Unique name relating your new Puppy; for example xenial32, tahr64, Slacko64_6.2. Left-Click the new folder to enter/view it’s contents (it's currently empty) and leave that window open.
Working with Puppy Linux’s System Files
As explained in detail, viewtopic.php?f=2&t=180, a frugal Puppy’s operating system consists of between 3 and 7 files, excluding the SaveFile/Folder you may later create to preserve changes. The minimum 3 are initrd(.gz), vmlinuz, and Puppy_VERSION_VersionNumber.sfs, e.g. puppy_xenialpup64_7.5.sfs. In addition to those, there usually will be a zdrv_puppy_Version_VersionNumber.sfs.
Puppies are packaged as ISOs. The post which provided the link to your Puppy’s ISO will tell you if it is necessary to separately download an fdrv_puppy_Version_VersionNumber.sfs. That post will also provide information regarding any adrv_puppy_Version_VersionNumber.sfs or a ydrv_puppy_Version_VersionNumber.sfs which you may want to download, or having been packaged in the ISO, you may want to remove.

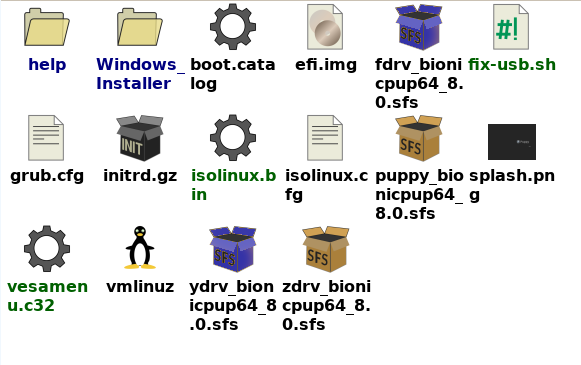
- 6-Bionicpup64-ISO-Unpacked.png (44.66 KiB) Viewed 11016 times
[The above is of the mounted ISO of a Remastered Bionicpup64’s. I swapped the kernel (vmlinuz & zdrv_xxx.sfs). The new zdrv_xxx.sfs did not include firmware. So I downloaded a firmware package and renamed it fdrv_bionicpup64_8.0.sfs. Also notice the absence of a bionicpup64_save_xxx.xfs. SaveFiles/Folders are not found in an ISO. Rather they are created by the User to store settings, customizations, and user installed applications. They are READ-WRITE. amethyst has created a tool for replacing SaveFile/Folders with either an adrv.sfs, a ydrv.sfs or both. viewtopic.php?t=1694 These are READ-ONLY. If used, once your Puppy has booted to desktop the USB-Key can be unplugged (unless and until a SaveFile/Folder is created). The graphic shows such a ydrv.sfs.
Caution: If there was either an adrv.sfs or a ydrv.sfs in the ISO, know what the Dev included in that file. Amethyst’s tools can still be used. But instruction on ‘how to’ are beyond the scope of this post].
Hint: Steps 7 & 8 are not necessary if the Puppy you want to locate on the USB-Key is the same as the Puppy you are currently running. Just file-browse to that Puppy’s System files.
Step 7: obtain/download your choice of Puppy.ISO.
Step 8: Left-Click the ISO. A window will open and you’ll see (and can access) the ISO’s files. Except that some will bear names relating to your Puppy, it will look something like the above graphic:
Step 9: Copy the system files from the ISO window into the folder you created in Step 6. The system files are initrd(.??), vmlinuz, and every file ending with .sfs, except adrv.sfs and ydrv.sfs IF you know they contain EXTRA applications you don’t want, or won’t always want. See the post referred to above for an explanation. [You need initrd which usually is packaged as initrd.gz, may be packaged as initrd.xz or sometimes not compressed at all and appears as just initrd].
To copy ONE file into the folder you created in Step 6, place your mouse-cursor on it, Left-Press, hold, then drag it into the folder you created in Step 6, select Copy.
Rox Short-Cuts: To copy a couple files at the same time, Hold-down the Ctrl key, then Left-Click each file you want to copy. Selected files will be highlighted. You can deselect a file by Ctrl-Left-Clicking it again. After you’ve selected all the files you want, Left-Press, Hold any of the selected files and drag it into the other folder. All selected files will ‘follow’.
To Select all files in a folder, Left-Click an empty space in that folder (to focus rox on the folder) then type Ctrl-a. All files will be selected. You can use Ctrl-Left-Click to deselect any.
Rox has another trick that is useful especially for dealing with files in one or several rows: the lasso, albeit this lasso is a rectangle. Visualize all the files you want as being in a rectangle (ignoring that other files may also be in it). Left-Click an Empty Space just beyond any corner of that rectangle, then drag the mouse cursor up-or-down to the furthest corner of that rectangle. All the files in the rectangle will be selected. You can use Ctrl-Left-Click to deselect any.
The Boot Loader:
You’ll find Menu>Setup>Grub4Dos bootloader config built into most Puppys. IT CAN NOT BE USED to boot from any computer employing the UEFI boot device. Some recent Puppys have Menu>Setup>Grub2 bootloader config builtin. If not, it can be downloaded from here: viewtopic.php?t=3360 . It can be used with both UEFI and ‘old-bios’ booting computers. [The only advantage to using Grub4Dos when possible is that you can provide it with your choice of a fancy splash screen].
Hint: You don’t have to execute a Save to use a newly downloaded Grub2Config. Just left-click the pet to ‘install’ it to RAM, and Menu>Exit Restart Graphical Server (AKA x). Puppy will re-catalog what makes up its system.
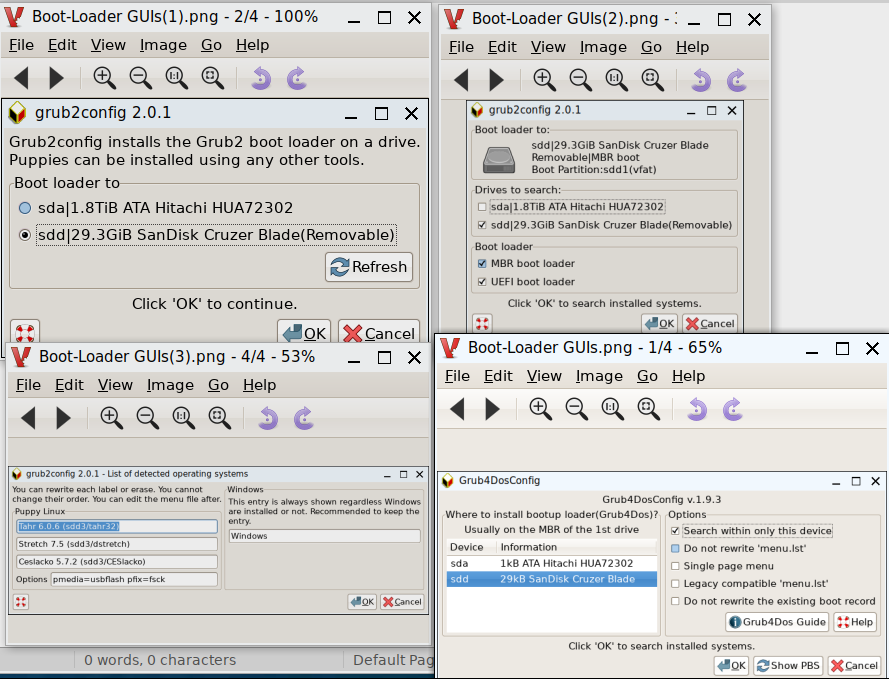
(1) Start your boot-loader application: either Menu>Setup>grub2 config or Menu>Setup>grub4dos. Select the USB-Key as the location onto which the boot-loader is to be installed. Caution: Be careful to select the USB-Key you want as the location to have the boot-loader written. You don’t want to overwrite the boot-loader on your hard-drive. In the below graphic it’s sdd.

- 7-Boot-Loader GUIs.png (187.1 KiB) Viewed 11030 times
Grub2 bootloader config –as it can be used with UEFI computers-- offers more choices, doing so through presenting 3 GUIs. Grub4dos only presents the GUI at the Bottom-Right. Notice that in the latter a Check mark has been placed in the “Search within only this device”, being the USB-Key selected/highlighted on the Left.
After each configuration selection you progress to the next by clicking OK. Until the last OK is clicked nothing gets written and a Cancel button will exit the application.
Dealing with SaveFiles/Folders: Your source for your ‘new’ Puppy may have been the Puppy you are running and for which you already created a SaveFile or SaveFolder. It is not recommended that you copy a SaveFile/Folder while it’s in use. Errors may be generated in the copy. You can accurately copy a SaveFile/Folder, but not while its being used. Boot into a different Puppy or debiandog; or into your ‘new puppy’ using the boot argument “pfix=ram”. Ask about the pfix=ram if you need to.
p.s. Don't forget to unmount (Left-Click) the ISO you mounted.
![]()