rcrsn51's p910nd print server...for 'awkward' Pups/hardware!

Moderator: Forum moderators

Post Reply
User avatar
mikewalsh
Moderator
Posts: 6158
Joined: Tue Dec 03, 2019 1:40 pm
Location: King's Lynn, UK
Has thanked: 795 times
Been thanked: 1981 times

rcrsn51's p910nd print server...for 'awkward' Pups/hardware!

Post by mikewalsh »

Evening, gang.

Having posted about Bill's "Eppi" Epson driver installer .pet the other day, I'm now going to post about another of his wee gems that have got buried under the detritus of years of forum posts.

This is the "p910nd Print Server". You can read about it here on the old Forum:-

https://oldforum.puppylinux.com/viewtopic.php?t=60474


I've always had issues with network printing. Whether it's me, or some weird combo of router settings that I've never got to the bottom of, I simply don't know. The Puppy firewall has always been disabled, the individual Puppy servers have always been set to "Share", yet the CUPS server on every one of my Pups stubbornly refuses to "share". The problem was there from the beginning, regardless of which hardware/Pup combo I tried. CUPS would NOT "share" across the local LAN.....and that's all there is to it.

Printing has always worked 'locally' in every Puppy I've ever tried, once set-up correctly. But trying to get my 'puters to see CUPS across the network is a bit like trying to describe the color 'blue' to someone born blind. Which is all the more strange, given that I can easily find any given Pup's CUPS server across the LAN by accessing it through a web browser..! But trying to get it to function.......ahh, now that's a different matter.

Which is where the p910nd print server comes in. You don't even try to use the standard localhost:631 connection; all p910nd does is to "listen", on port 9100, for any incoming print-jobs.....and when it finds one, it simply sends it direct to your printer. CUPS doesn't really figure much in this process at all, except for setting-up your "remote" printer.


You need to have p910nd installed on both machines, since the GUI has sections for server AND client, and controls both sides of the process.

You 'install' your printer on the client machine using the "Add New Printers" button, and selecting the "AppSocket/JetDirect" protocol. You need your printer drivers installed, because you set this up as though the printer were connected direct to the client; the client formats the print-job, then sends it to a "socket" on port 9100. Instead of being joined by a physical USB cable, with a plug at either end, you're joined instead by a wifi connection, with a "port" at one end and a "socket" at the other.

The p910nd daemon listening on the server's port 9100 will detect it.......and sends it straight to the printer. Sorted..!

I've had to use it today, since I'm trying to get remote printing working from the refurb'd Latitude I got last year. I haven't had remote printing set-up for a few years, and had forgotten about the shenanigans.....and despite assisting Bill in the development of p910nd, had completely forgotten all about it..... :oops:

It still works as well as it ever did, I'm pleased to say. The beauty of this thing is that, once set-up and functioning on the client (for anyone with misbehaving hardware like mine), the only thing you need do on each Puppy you wish to use as a server is to install p910nd.

It's as simple as that. Thanks, Bill..! :thumbup:

Mike. ;)

User avatar
mikewalsh
Moderator
Posts: 6158
Joined: Tue Dec 03, 2019 1:40 pm
Location: King's Lynn, UK
Has thanked: 795 times
Been thanked: 1981 times

Re: rcrsn51's p910nd print server...for 'awkward' Pups/hardware!

Post by mikewalsh »

To elucidate further:-

The beauty of this thing is that, once set-up and functioning on the client (for anyone with misbehaving hardware like mine), the only thing you need do on each Puppy you wish to use as a server is to install p910nd.

There is a little bit more to it than I stated above. But not much more....


Obviously, it goes without saying that, whichever Puppy you're employing as the print-server, that Puppy needs to have the printer set-up, configured correctly, and fully-functional. Otherwise you're just wasting your time.

It's perfectly possible to set up as many "remote" printers as required. Bear in mind that the method as stated in the link to Bill's thread on the old Forum uses the "socket" protocol. And this works for exactly ONE IP address per connection.....and every Puppy you run will be using its own unique IP address. Which brings me to another wrinkle:-

If you run things as most of us probably do, then you're allowing your IP's DHCP server to assign you a random address every time it connects. So your IP addy is different every time you boot.......see where I'm going with this?

Because we're using your Puppy's IP addy to connect to the p910nd print-server, it's going to work exactly once.......the next time you boot, your IP addy will have changed, so you'll lose your connection. The way round this is to connect to the network via a "static" IP. Which will always remain the same......and thus guarantee a stable connection to the print-server.


Setting-up a "static" IP address is simple. I'll use Network Wizard for this example, since it's the only one that really lets you do this anyway.

Bring the Network Wizard up, and select what you'll be connecting with. If it's wireless, establish your connection first. If it's Ethernet, we can dive straight in to assigning an IP addy.

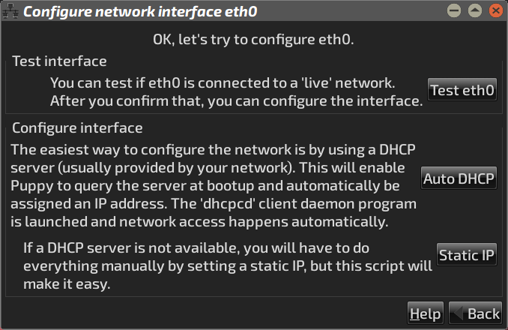
You'll end up at this screen, either way:-

Image

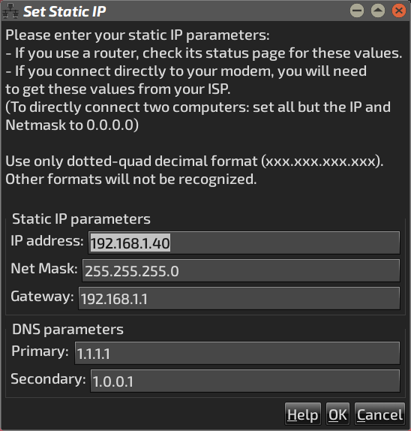
Ignore the 'Auto DHCP' button, and hit the 'Static IP' button instead. You'll arrive at this window:-

Image

Now; it looks complicated, but it isn't, not really. Let's take these one by one:-

  • The 1st box is 'IP address'. This is where you manually choose the permanent IP address this Puppy will henceforth use. "192.168.1." is always the same for a local area network, or LAN. Only the final number changes; I usually select something between 30 and about 200 (normally like '30', '40', '50'.....like that). 192.168.1.30, or 192.168.1.40, or 192.168.1.50.....and so on. Multiples of 10 are just easier to remember, I find.

  • Your second box is 'Net mask'. Now, so far as I know this should always be as above:- "255.255.255.0". I may be wrong, but research shows me it's almost always this, UNLESS you have a weird home set-up. I'm sure I'll get corrected if I'm wrong.

  • Your third box is 'Gateway'. This is basically the primary address of your router, where the system connects to the greater WAN of the world-wide web.....and research, again, shows this is almost always "192.168.1.1". Again, oddball home setups may be different.

  • The last couple of boxes, you don't really need to worry about these. Normally, they'll auto set themselves depending on what your ISP's DNS server assigns you. I'm using CloudFlare's DNS server here, which is - supposedly! - a bit more secure, and a bit faster connecting. For most folks, these can be ignored.

Now, hit 'OK'. You'll get a final wee window, telling you the default route is successfully set-up thru the 'Gateway'. Hit 'OK'.....and you'll return to Network Wizard again.

Image

Hit 'Done' to finish.

That's it!


Having 'stabilised' your IP addresses, your client computer can be set to connect to as many 'print-servers' as you like. Just remember that you'll need to set-up another 'remote printer' in CUPS, using AppSocket/JetDirect & your printer drivers, for the unique IP of each Puppy you wish to use as a 'print-server'. I use one of four Pups on the big HP desktop rig on a regular basis, so on the Latitude I've set-up four separate 'remote printers'.....one for each Pup's unique static IP.

It works beautifully..!

Hope this perhaps helps some of you. :)

Mike. ;)

Post Reply

Return to “Printing”